|
With a bit of forward planning and practice it is remarkably easy to take
photographs of yourself and the pike you catch.
As with any aspect of pike handling your first priority must be for the fish itself
and, with this in mind, having it out of the water for the absolute minimum amount
of time necessary to weigh and photograph should be your aim. Here
is the sequence of events that leads to taking the final shot. - With
the pike safely in the net unclip the trace or, if possible, remove the hooks.
- Secure
the net so that the fish is comfortable and cannot escape.
- Place
the unhooking mat in a suitable spot.
- Wet
the weigh sling and tare off the scales.
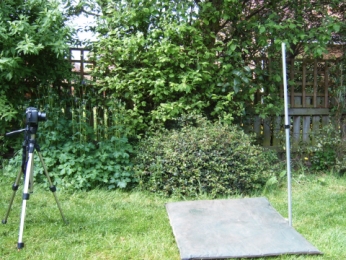
- Kneel
behind the unhooking mat and push an extending bankstick into the ground directly
in front of you, extend it until the top is slightly above the top of your head.
- Attach
the camera to the tripod and place a suitable distance from the pre-positioned
bankstick. Try and set the camera height so that it is on the same level as the
fish for best results.
- Zoom
in/out until the top of the bankstick is at the top of the frame whilst the back
edge of the unhooking mat just shows at the bottom. Remember that you can always
crop the photograph at a later date.
- Remove
the bankstick and pose as if holding the fish (don't worry, there's no-one there
to see you!).
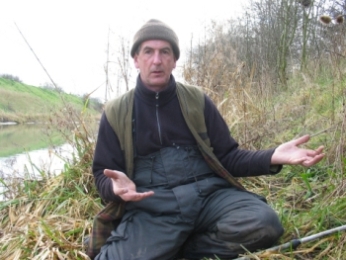
- Using
your preferred method, more of which later, take one shot and check that it is
OK. A camera with a flip round screen allows you to judge the composition and
pose without having to leave the unhooking mat. Adjust the camera as necessary
and repeat until you get the desired result.
With
the above preparation complete it is now just a case of lifting the net from the
water; unhooking and weighing the pike and placing it, still in the weigh sling,
onto the unhooking mat ready for the camera. Hold
the pike in a suitable pose and take the required number of shots then place the
pike back in the weigh sling to transport it back to the waters edge and release
it. By following the steps outlined above you should have a perfectly good photographic
record of both you and your catch and, more importantly, the fish was out of the
water for the absolute minimum amount of time. 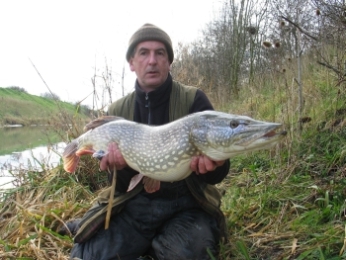
It
is worthwhile having a dry run in the garden when you first try this as it will
give you a good idea of camera position etc. and save a lot of messing around
on the bank. So,
having described the way in which to set up and take the photograph let's take
a look at the various remote systems available to us. Self
Timer
Virtually all
cameras come with a self timer facility built in, this can be set to take multiple
shots on some but most only allow for one shot before the shutter release button
needs to be pressed again. The biggest drawback to this method is that it entails
laying the pike down and leaving it unattended, with the potential for damage
that entails, whilst the shutter release is pressed. Not the preferred system
and one to use only in an emergency. Other self timers allow the taking of multiple
shots, with a delay between each, which is a slightly better system. It is worth
noting that most self timers cause the camera to focus as the shutter release
is pressed - so they can focus on a point behind where the fish will be held and
result in out of focus shots. Cameras that can be focused manually get round this
problem. Infra
Red Remote
Some cameras
come with this as standard and they can be very useful as they very often allow
you to zoom at the same time, coupled with the fold out screens on some of the
Canon range of cameras self take becomes very easy. They do, however, have one
very obvious drawback and that is the fact they are electronic and do not take
kindly to getting wet. Not only can this be expensive but it also causes problems
as, invariably, you only become aware of the damage when you come to use the release. Bulb
Release
Simply a
bulb attached to a plunger via a length of tube, as the bulb is compressed the
plunger acts on the shutter release and the picture is taken. In use it couldn't
be simpler, attach the business end to the camera and place the bulb beneath a
knee (or a heel), all it requires is a slight increase in pressure and the camera
fires. Good
though the system is it does have a couple of pitfalls. The bulb tends to sink
into soft ground and thus become useless although this is easily remedied by placing
a piece of plastic, sandwich box lid or the like, on the ground first. The second,
and perhaps biggest, drawback is that camera manufacturers rarely equip shutter
release buttons with the thread needed to attach the plunger assembly, this requires
the additional purchase of some sort of bracket although these are freely available.
A word of warning, don't waste your money on the velcroed rubber band type, buy
a proper bracket as shown in the accompanying photographs as they are much better. 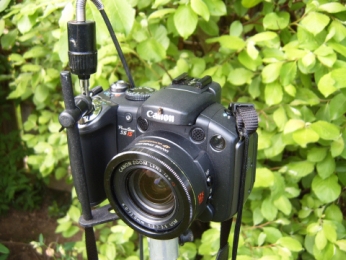
Although
a tripod is referred to throughout, strictly speaking, it isn't a necessity as
a bankstick fitted with a camera adaptor fits the bill perfectly and is one less
thing to carry. Finally,
the use of a digital camera has been assumed as these are far and away the most
commonly used now. The same principles apply to the use of a film camera but you
don't get the opportunity to check the framing by using the playback facility.
Thanks
to Graham Slater for providing the bulk of the text and all photographs for this
page. | 
